Pages

Monday, October 15, 2012

Don't open until Christmas!


If you are coming to any of our events listed below, you will get to make this Milk Carton/Gift Box along with other projects:

Sunday, October 21st, 2012
Boxes Class at Scrap Happy in Tiffin, Ohio
click HERE for more information

Saturday, November 3rd, 2012
Workshop at Andie's Scrapbooking in Bakersfield, CA
please call the store at 661-831-2766 for more information and to sign up

Saturday, November 10th, 2012
Copic Project Workshop at Katie's World in Stockton, CA
please call the store at 209- 931-8131 for more information and to sign up

Sunday, December 2nd, 2012
Workshop in San Jose, CA
click HERE for more information

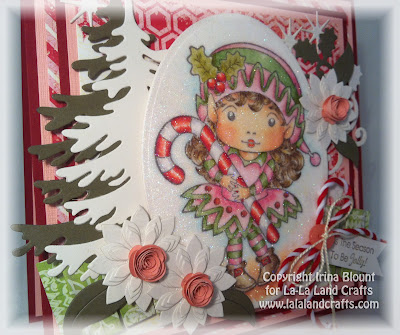
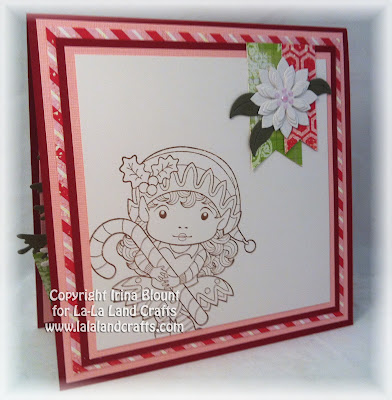
My project features these products from La-La Land Crafts:

Stamps - Christmas Elf Luka, Sentiment from Christmas Present Luka
Dies - Christmas Tree, Heart Fence, Rolled Rose Large, Rolled Rose Small and Large Flourish

 
All layers of my Milk Carton Gift Box were inked with Vintage Photo distress ink.


I applied Crackle Paint in Picket Fence to the Christmas Trees, Fence and the roof of my box. 


I added Crystal Stickles over the paint and to the rolled roses.

Christmas Elf Luka was colored with Copics:
Skin - E00, E01, E11, E13
Blush - R30,
R20, R21
Hair - YR20, YR21, YR24, E57
All Red - R22, R24, R27, R29, R59
All Green - YG03, YG25, YG17, YG00, YG97
All White - W1, W3
Aqua Present - BG11, BG53, BG57, BG75
Pink Present - RV10, RV11, RV13, RV14, RV19
Purple Present - V01, V12, V15, V17, BV08
Blue Present - B000, B00, B01, B05, B45
Yellow Present - Y15, Y17, Y35, Y38, YR14

 
Hugs!

Monday, October 8, 2012

'Tis the Season To Be Jolly!


I tried something new today - coloring with Copics on glitter!   I used regular cardstock (any white cardstock will do) covered with Scor-tape and Glitter Ritz Glitter in Cool Highlights. Once you burnish the glitter, it doesn't come off!  It doesn't even get on your Copics! So AWESOME!   Marci was stamped in Memento Tuxedo Black on top of glitter and then colored with Copics.  It's very different then coloring on paper, image looks a bit muted but it's oh so pretty and very very sparkly!  Especially when you get it under the light.  So, so pretty!  And of course it's just perfect for Christmas cards!

My card features our Christmas Elf Marci (sentiment comes with Marci stamp) and these La-La Land Crafts Dies - Christmas Tree, Holly Flourish, Large Flourish, Lotus and Rolled Rose (small).

Can you see sparkle on this photo better?  
You might need to enlarge the photo (just click on it) to see it.

I used my Scor-Pal to create a pleated paper ribbon.  I scored at 1/2" and 1/4" repeatedly and then folded the pleats.  It's held to the card with Scor-tape.

Flowers are made with Lotus Die and Rolled Rose Die (small) in the middle.  Roses look more like a coral color in the photo, but they are really pink, they were die cut from the same cardstock as the layers on my card.  Leafs under the flowers are from our Large Flourish Die.

I stamped Christmas Elf Marci inside of my card in Vintage Photo ink.  Banners were made with leftover papers.  The same flower as in front of the card, but with Pearl Pen in the center.

Christmas Elf Marci was colored with Copics:
Skin - E13, E11, E01, E00
Blush - R21
Hair - E47, E44, E43, E42
All Red - R39, R27, R24, R22
All Pink - RV34, RV11, RV10
All Green - YG95, G24, G21
Shoes - E47, E44, E43, E42
Ground -  E13, E11, E01, E00
Background - B00, B000, 0

Hugs!!

Wednesday, October 3, 2012

Warm Winter Wishes!


I just love making white on white cards for Christmas.  There is just some simple elegance in them with all the layers and different textures.

My card today features our Christmas Lantern Marci stamp along with our DIES - Christmas Tree, Heart Fence, Large Flourish and Lotus.  Sentiment is included with Christmas Lantern Marci stamp.

Top of the front panel is embossed to add texture to my card.  I also used a doily behind Marci.

Heart Fence was cut in half and attached to each side of the card.  See those pretty stars?  They are the centers from the Lotus Die, I thought that they were just perfect for the Christmas night scene!

I made white poinsettias with our Lotus Die by layering all the different size flowers in a manner to resemble the poinsettia.  Leaves were cut from the Large Flourish Die.

I might have gone a bit overboard with the inside of my card, but I really love how it turned out!
Christmas Lantern Marci was stamped in Vintage Photo ink inside of one of the circles.  Behind the circles is a doily and I used our Filigree Corner die on the top and the sides of the doily.  I used the same Filigree Corner for the corners as well.

Christmas Lantern Marci was colored with Copics:
Skin - E00, E93, E11, E13
Blush - R20, R30
Hair - E43, E44, E47
Coat, Hat - E51, E53, E55
Dress - R21, R22, R24, R29, R59

Hugs!!

Monday, September 17, 2012

The Witch is in!

 
The Witch is in!   I made a card with a few products from our new release today.  The front of my card features Flying Witch Marci, Scary Tree die and Creepy Vines die.  Sentiment is included with Flying Witch Marci stamp.


I cut 4 layers of Scary Tree out of thin chipboard.  Removed eyes and mouth from the top two and left them in the bottom two, really love the depth!  I inked all the layers with Vintage Photo Distress Ink and then stamped texture with one of the background stamps from Hero Arts.


I cut one of the Creepy Vine diecuts (there are two in this die set) in pieces and layered them behind the "hills".  I used our Filigree Corner die, well.. for the corners ;-)

I stamped another Flying Witch Marci image inside of my card, this one was stamped with Walnut Stain Distress Ink.  Sentiment inside of the card is from Vampire Luka stamp.  You can see I also have our Eerie Bats here, there are 3 bats in this set - all different sizes and styles!


Flying Witch Marci was colored with Copics:
Skin - E00, E93, E11, E13, BV01
Hair - Y17, YR16, YR18, R59
Dress and Hat - E51, E53, E55, E57, E59
Hat Buckle, Star - Y17, Y38, YR24
Cape - V12, V15, V17, BV08
Boots - YG93, YG95, YG97
Broom - E21, E17, E29 / E43, E44, E47
 
Hugs!
 

Friday, September 14, 2012

OWH - We Salute You!


 Today we are being featured on the Operation Write Home blog!   There is even our interview there!  What an HONOR!  YAY!!!

Of course I just had to make a card for the occasion.  And what a better image to use than on my project today than our Saluting Luka!  

Sentiment is included with this Luka stamp.  The dog is one of the Tuffy stamps from our Tuffy Set, he is a perfect companion to our Saluting Luka!

I made the "Made in USA" flags by attaching pieces of paper to toothpicks.

I used our Heart Fence Die, cut it in half and added to each side of my card.

This is the inside of my card.

Saluting Luka was colored with Copics:
Skin - E00, E01, E02
Hair - E21, E23, E25
Shirt - E50, E51, E53, E55
Tags - W1, W3
Hat and Pants - E53, E55 / E44 / YG91, YG93 / T3 (for shadows)
Boots - C1, C3, C5, C7

Hugs!!


Thursday, September 13, 2012

Lil' Devil Marci - Trick or Treat Box PLUS Tutorial!


 Here is my first project with a few products from our NEW September Release!  I designed a little Halloween Treat Box.  This is the same style box as I posted HERE.  As you can see, it's very versatile!

Here are simple instructions for my Treat Box:

1. Score a piece of 4" x 12" cardstock at 5 1/4" on each side and fold.  This is your base.


2. Score a piece of 4" x 6" cardstock at 1 1/4" on each side.  Cut on the scored lines as shown:


3. Make a box.


4. Attach the box inside of the base.


- Embellish front as desired.
- Punch a hole and insert the ribbon.
- DONE!  Easy peasy!!!

I used our Lil' Devil Marci for the front of my box.  She is all dressed up and ready for Halloween!  Sentiment is one of the accessory stamps included with Lil' Devil Marci.

I also used our NEW Frightful Fence and Eerie Bats Dies.  Love them both!

I cut the Frightful Fence in two pieces and layered it behind the "hill".


Lil' Devil Marci was colored with Copics:
Skin - E00, E01, E11, E13
Blush - R20, R30, R21
Hair - E02, E08, E17, E18, RV69
Outfit - RV52, RV55, RV66, RV69
Boots - C1, C3, C5, C7, C9

Hugs!!!

Sunday, September 2, 2012

Celebrate

 Here is a card that can be used for many different occasions by changing the sentiment.  It has no coloring at all and no stamping besides the sentiment.  Everything used on my card was cut with our dies!  That's right!


I used two left over fence panels for inside of my card.


Hugs!!!

Sunday, August 26, 2012

Summer Time!


You can probably tell, I love-love-love making little milk carton box houses!  LOL!!!  

This one is made with our Summer Marci and these dies - Heart Fence, Large Flourish and Sun (from the Island Die Set).


I designed and cut both the milk carton box and the roof for it on my Silhouette.
Papers are by Humbly, you can buy them here and here.


Copics:
Skin - E00, E01, E11, E13, B00
Blush - R20, R30
Hair - YR31, E51, E53, Y26, E55
Outfit - RV52, RV55, RV66, RV99
Shoes and Sunglasses - YG01, YG03, YG93, YG95
Bucket - B00, B01, B02, B45
Shells - YR21, YR23, YR24

Summer Marci stamp and all of the dies used on my project are available in our store HERE.

Hugs!!!